If you’re planning to grow indeterminate tomatoes this season—especially vining varieties like cherry or heirloom types—then building a sturdy, budget-friendly wooden tomato trellis should be at the top of your to-do list. These vigorous growers can quickly become unmanageable without proper support, and with the rising cost of store-bought tomato cages, many gardeners are turning to DIY wooden tomato trellis projects as a smarter, more adaptable solution. Constructing your own trellis not only saves money but also gives you full control over size, materials, and strength.
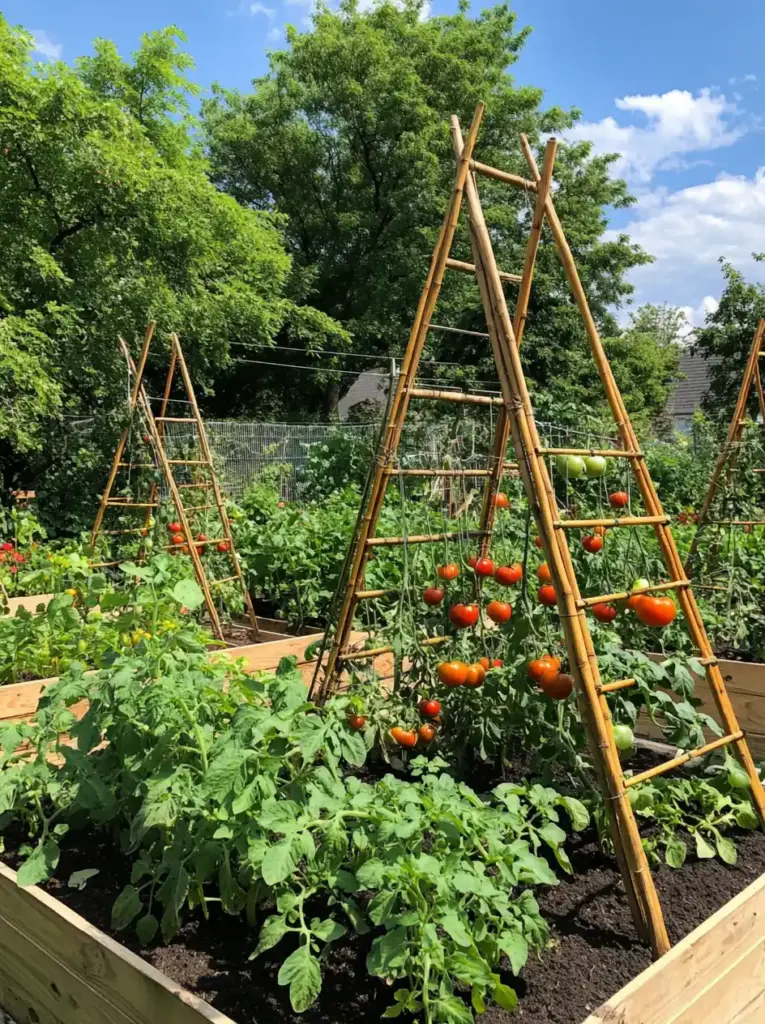
In this detailed guide, you’ll learn how to craft a foldable wooden tomato trellis that’s perfect for both compact raised beds and expansive garden plots. The design is practical, costing around $20 per unit, and folds flat for off-season storage—an excellent feature for gardeners who are short on space. Even better, this trellis is easy to build with basic tools and minimal experience, making it ideal for both beginners and seasoned DIYers.
This adaptable design supports flexible depth, giving your tomato plants room to breathe and thrive. If you’re also growing other climbing crops, take a look at our cucumber trellis ideas or even our trellising guide for pumpkins for inspiration. And don’t miss our article on 5 easy tomato trellis ideas if you’re looking for variations to expand your support system. With a strong wooden tomato trellis, your plants will stay upright, healthy, and productive all season long.
Table of Contents
Trellis Dimensions and Budget Breakdown
Before diving into assembly, it helps to know exactly what you’re building. This wooden tomato trellis is designed for versatility and strength while keeping costs low. Whether you’re working with raised beds, in-ground plots, or planter boxes, the frame can be adjusted to fit your layout with ease.
🔧 Final Trellis Dimensions:
- Height: Approximately 4.5 feet tall
- Width: Around 4 feet wide
- Depth: Adjustable (typically 2–2.5 feet between front and back legs)
This size offers excellent vertical growth space for indeterminate tomato varieties, ensuring good airflow, sun exposure, and ease of harvesting.
💰 Estimated Cost: ~$20 per Trellis
Depending on your local material prices or what you already have on hand, each unit costs roughly $20 to build—far less than many commercial options.
Materials & Tools You’ll Need
Everything needed to create this wooden tomato trellis can be found at your local hardware store or garden center. You might even have some of these supplies in your shed already!
🧰 Materials List (per trellis):
- (4) 5-foot wooden garden stakes (for vertical supports)
- (8) 4-foot bamboo stakes (for horizontal crossbars)
- (1) 3/8-inch x 4-foot wooden dowel (serves as a hinge)
- Twine (for reinforcing connections)
- Small galvanized nails (approx. 1.5″ long)
- Hot glue gun (optional but useful for added hold)
🛠 Tools You’ll Need:
- Drill with 3/8″ or 7/16″ drill bit
- Sandpaper (fine grit for smoothing dowel holes)
- Hammer
- Tape measure
- Pencil or marker
- (Optional) Dead-blow hammer for tight-fitting assembly
All tools and materials are easy to source, and this project is beginner-friendly with basic DIY skills.
How to Build a Wooden Tomato Trellis: Step-by-Step Instructions

This DIY wooden trellis is simple to build and doesn’t require complex woodworking skills. You’ll construct two identical panels and connect them with a dowel hinge, allowing for foldability and easy storage.
🔨 Step 1: Drill Anchor Holes
Take all four 5-foot wooden stakes and drill a hole about 5 inches from the flat (top) end. Use a 3/8-inch or 7/16-inch drill bit, depending on availability.
Tip: If the dowel doesn’t fit snugly, wrap fine-grit sandpaper around a pencil and gently sand the inside of each hole until the dowel slides in firmly but smoothly. This will serve as the pivot point for your foldable trellis.
📝 Step 2: Mark Crossbar Placement
Lay two of the wooden stakes flat on the ground, with the holes you just drilled facing outward.
Using a tape measure and pencil, mark the following positions:
- First mark: 12.5 inches down from the top
- Then: Make three more marks, each 7.5 inches apart moving downward
These marks indicate where the bamboo crossbars will be installed.
🔩 Step 3: Install Bamboo Rails
On each of the marks, gently hammer in a small galvanized nail—these will act as mini “shelves” for your horizontal bamboo stakes.
Space the two stakes about 4 feet apart, then lay one 4-foot bamboo stake across each pair of corresponding nails to create a simple ladder-like structure.
🔧 Step 4: Secure Bamboo with Glue and Twine
- Place a small dot of hot glue where each bamboo crossbar touches the wooden stake to keep it from shifting.
- For extra durability, wrap a short length of twine tightly around the joint where bamboo meets wood.
Repeat this process for all bamboo bars. Now, you’ve completed one side of the trellis.
🔁 Step 5: Build the Second Trellis Panel
Repeat Steps 2–4 to construct the second identical panel using your remaining two wooden stakes and bamboo stakes.
You should now have two matching frames, each reinforced with crossbars and twine.
Final Assembly: Creating the Foldable Frame

Once both panels are complete, it’s time to join them together with the wooden dowel to form a stable, collapsible A-frame trellis.
🔗 Step 6: Insert the Dowel and Assemble the Frame
- Lay the Panels Flat:
Place one panel bamboo-side down (this will be your back panel). Lay the second panel bamboo-side up on top of it, aligning the tops so the drilled holes match up. - Insert the Wooden Dowel:
Carefully thread the 3/8-inch wooden dowel through the drilled holes on both pairs of stakes.- Tip: It should be a tight fit. Twist the dowel as you go, or gently tap it through using a dead-blow hammer if needed.
- If it feels loose, secure it with a bit of hot glue or wrap with twine at the ends.
- Spread the Panels Apart:
Once the dowel is in place, stand the structure upright and gently spread the bottom ends apart to form a stable A-frame. The depth is adjustable, so you can set it to fit your garden space (typically 2–2.5 feet apart at the base).
Step 7: Installing the Trellis in Your Garden
With the frame fully assembled, it’s time to place your trellis where it will do the most good.
🌿 Installation Tips:
- Insert the stakes directly into the ground, raised bed, or planter box by pressing or gently tapping the pointed ends into the soil.
- Make sure the frame is level and sturdy. The dowel hinge and dual-panel design offer great balance and multiple anchor points.
- As your tomato vines grow, weave them through the bamboo crossbars, or loosely tie them with garden twine to help them climb and stay supported.
Why This Wooden Tomato Trellis Works

- Budget-Friendly: Costs far less than store-bought cages or elaborate systems.
- Space-Saving: Folds flat when not in use—perfect for winter storage.
- Customizable: Adjust dimensions to fit any space, from narrow containers to wide beds.
- Strong & Flexible: Supports indeterminate tomato varieties, even as they grow tall and heavy.
🌱 Frequently Asked Questions (FAQ)
❓ What type of tomatoes need a wooden trellis?
If you’re growing indeterminate tomato varieties, such as cherry, heirloom, or beefsteak tomatoes, a wooden tomato trellis is an absolute game-changer for your garden. These plants don’t stop growing until frost hits, often reaching heights of six feet or more. Without proper vertical support, they’ll sprawl along the ground, becoming more prone to pests, diseases, and reduced airflow. That’s where a sturdy, foldable wooden tomato trellis steps in—lifting your vines up and off the soil, encouraging healthier fruit production and easier harvesting.
Whether you’re growing in raised beds or containers, using a trellis tailored to your plant’s growth habit is essential. For more inspiration, check out our roundup of 5 easy tomato trellis ideas that offer creative ways to support climbing varieties. You can also explore vegetables to grow for beginner gardening to pair your tomatoes with compatible crops. A strong wooden tomato trellis isn’t just helpful—it’s one of the best investments you can make for indeterminate tomato success.
❓ Can I adjust the size of this trellis?
Absolutely! One of the best features of a wooden tomato trellis is how customizable it is to your garden’s unique layout. Whether you’re working with compact containers on a patio or spacious raised garden beds, you can easily tailor the trellis to suit your needs. If you’re planting in tighter spaces, you can trim the height or narrow the width to keep things tidy without compromising support. On the flip side, if you’re growing in a larger bed, you can expand the frame and even add extra vertical stakes for reinforced stability.
Thanks to the clever folding-frame design, you can also adjust the depth of the structure to optimize airflow and access to your plants. This flexibility makes it a smart solution for gardeners who need adaptable infrastructure across different spaces or growing seasons.
Looking for ideas to complement your custom trellis? Explore our guide to raised bed gardening mistakes to avoid so you can get the most out of your garden setup. You might also enjoy browsing DIY trellis designs for vertical gardening, which offer additional inspiration to make your wooden tomato trellis work even harder for you.
❓ How long does it take to build?
For most home gardeners and DIY enthusiasts, building a wooden tomato trellis is a manageable and rewarding weekend project. On average, it takes about 1 to 2 hours to complete a single trellis from start to finish—even less if you’ve already gathered and prepped your materials. The process involves basic tools like a drill, hammer, and tape measure, making it friendly for beginners and experienced DIYers alike.
To streamline the build, consider organizing all your supplies ahead of time, cutting stakes to size, and pre-marking your measurements. That little bit of prep work can significantly reduce assembly time and make construction smoother.
If you’re new to garden projects, you might find these DIY budget garden walkway ideas helpful for getting into a confident rhythm with your outdoor builds. You can also explore other creative support options in our roundup of 10 innovative DIY garden trellis ideas to find variations that complement your wooden tomato trellis setup. No matter your skill level, this project is a fast, functional way to elevate your tomato-growing success.
❓ Will it last more than one season?
With proper care, including storing it indoors during winter and avoiding prolonged exposure to moisture, this wooden trellis can last multiple growing seasons. Applying a weather-resistant sealant can extend its life further.
❓ Is this trellis strong enough for large tomato plants?
Yes! The combination of wooden stakes, bamboo crossbars, and twine reinforcement creates a strong, stable structure ideal for tall, heavy tomato vines.
❓ What’s better: a wooden trellis or a metal tomato cage?
Wooden trellises are more customizable, easier to store, and budget-friendly, while metal cages are bulkier and often more expensive. For indeterminate tomatoes, wooden trellises offer better long-term support and airflow.
Final Thoughts: Grow Better with a Wooden Tomato Trellis
Building your own wooden tomato trellis is a smart, satisfying weekend project that pays off all season long. Not only does it give your tomato plants the structure they need to thrive, but it also saves space, money, and hassle. Whether you’re working with raised beds or planters, this foldable design makes storage simple and offers excellent support for tall, vining varieties like indeterminate cherry tomatoes.
If you’re exploring more DIY garden solutions, check out other tutorials on composting bins, raised garden beds, or vertical herb gardens to expand your green space efficiently.
Happy planting — and may your tomato harvest be bountiful!


